

Now that we have image rendering down, it is time to look at font rendering on the SSD1351. As before the techniques used here will work with other graphics displays and libraries with minimal effort.
Colour Handling
Before we look at the fonts themselves we should look at setting colours to render the fonts. I think many of us are used to using hex codes for colour in many places, so I created this quick routine to convert hex colours to RGB565 colours:
inline uint16_t ssd1351_make_colour(uint8_t red, uint8_t green, uint8_t blue)
{
    uint16_t ret;
    ret = (red & 0xf8) << 8;
    ret |= (green & 0xfc) << 3;
    ret |= (blue & 0xf8) >> 3;

    ret = __builtin_bswap16(ret);

    return ret;
}
I could have probably calculated this without the byte swap at the end, but it still runs very fast on the RP2040. Basically, this trims off the lower parts of the colour values for the 24-bit RGB values and packs them into a 16-bit colour.
Character Rendering
I have four fonts in my code right now, to make it simple they are various sizes of monospace fonts. They are stored line by line for each character in the font. Let’s start with the top of the function:
uint8_t pos_x = 0;
uint8_t pos_y = 0;

static void ssd1351_put_char(buffer_type type, char c, uint16_t colour, font font_type, bool transparent, bool invert)
{
    uint8_t font_width, font_height;
    const unsigned char *font_ptr;
    if (font_type == FONT_LARGE)
    {
        font_width = 12;
        font_height = 16;
        font_ptr = (unsigned char*)font_12x16;
    }
    else if (font_type == FONT_LARGE2)
    {
        font_width = 15;
        font_height = 16;
        font_ptr = (unsigned char*)font_16x16;
        c -= 32;
    }
    else if (font_type == FONT_IBM)
    {
        font_width = 8;
        font_height = 8;
        font_ptr = (unsigned char*)font_8x8;
    }
    else
    {
        font_width = 8;
        font_height = 8;
        font_ptr = (unsigned char*)font_topaz;
        if (c < 32)
        {
            return;
        }
        c -= 32;
    }
For each font here we are defining the width and height of each character in pixels. Some of the fonts don’t start until the ASCII character 32 so we take 32 away from the ASCII character requested.
Next up we copy the required character’s data into a buffer:
    uint8_t font_width_bytes = (font_width + 8 - 1) / 8;
    uint8_t character[font_height * font_width_bytes];
    uint8_t *buffer = get_buffer(type);
    // Position already too far
    if ((pos_x + font_width) > WIDTH)
        return;

    memcpy(character, &font_ptr[(uint16_t)c * font_height * font_width_bytes], font_height * font_width_bytes);
Based on the width we can calculate how many bytes each row of the character will be, multiply that by height and we have the number of bytes for the whole character. There is also a small check to see if rendering the character will push us off the screen.
Now comes the complicated bit, rendering the font from the bits in the character buffer:
    for (uint8_t i = 0; i < (font_height * font_width_bytes); i += font_width_bytes)
    {
        uint16_t pos_y_off = (WIDTH * (pos_y + (i / font_width_bytes)) * 2);
        // Create a 2 byte RGB565 pixel for every dot in the font.
        for (uint8_t j = 0; j < font_width; j++)
        {
            if ((character[i + (j / 8)] >> j - ((j / 8) * 8)) & 1)
            {
                if (invert)
                {
                    buffer[(pos_x * 2) + pos_y_off + (j*2)] ^= 0xff;
                    buffer[(pos_x * 2) + pos_y_off + (j*2)+1] ^= 0xff;
                }
                else
                {
                    memcpy(buffer + (pos_x * 2) + pos_y_off + (j*2), &colour, 2);
                }
            }
            else if (!transparent)
            {
                buffer[(pos_x * 2) + pos_y_off + (j*2)] = 0x0;
                buffer[(pos_x * 2) + pos_y_off + (j*2)+1] = 0x0;
            }

        }
    }

    pos_x += font_width;
}
So, for each bit of each line of the character, we check to see if it is a one or zero calculate the position in the buffer we are writing to based on the X and Y position and set the colour. We have a few options here. If it is a boolean one we can either copy the colour into the buffer or if the function was called with the invert boolean set then it will ignore the colour and invert the colour in the buffer at that position. If it is a boolean zero we can either set a black pixel or if the transparent boolean option is set we just ignore that pixel. This effectively makes the background of the font transparent.
Text Strings
Now that we can render a single character it is easy to scale this up to a full string of text. Simply loop over a character string like this:
void ssd1351_write_text(buffer_type type, const char *text, point_t pos, uint16_t colour, font font_type, bool transparent, bool invert)
{
    pos_x = pos.x;
    pos_y = pos.y;
    while (*text)
    {
        ssd1351_put_char(type, *text++, colour, font_type, transparent, invert);
    }
}
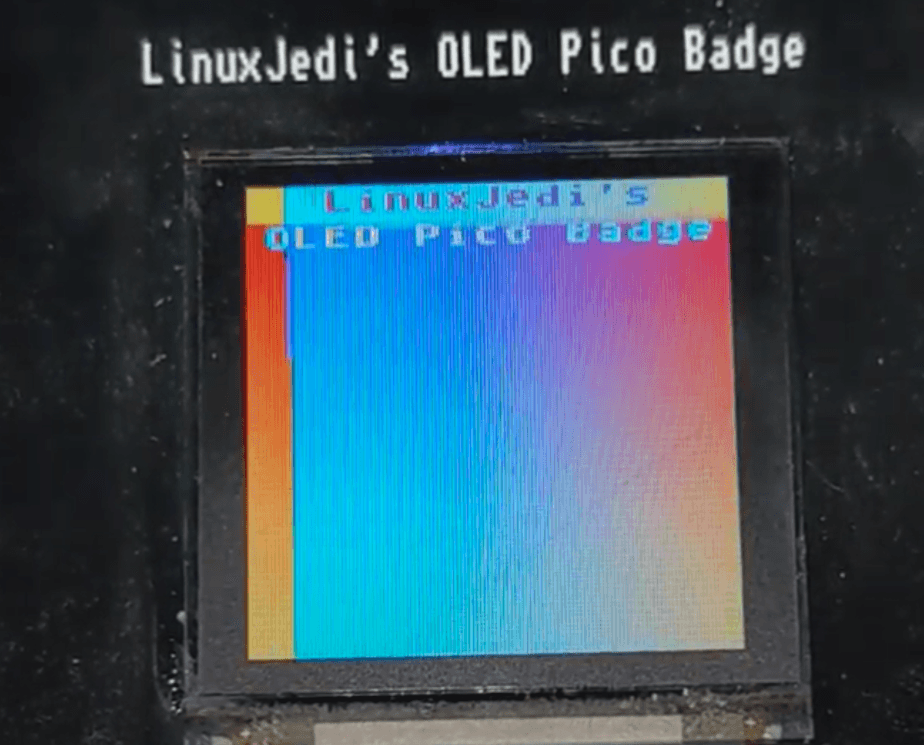
The end result of a text string with the transparent and invert options set is this:
Next Time
We can draw images and text, how about shapes? Next time we will look into rectangles, circles and triangles with efficient algorithms to render each.
Leave a Reply