I finally got Jops to generate a good DiagROM serial output, but the video output wasn’t working. This time I dig further into why that is happening.
Video Testing
I thought I might try connecting the SCART cable to my (rather dusty) OSSC device. This is much more forgiving for video inputs and will give an HDMI output, as well as information about what is coming in.

We get sync, which is good, let’s look at the picture.
Well… The colour flashing at the beginning is correct, but then a white box? That should be a black box with text in it.
On a subsequent boot, I can just about see text at the bottom of the screen in white.

This led me to think that the reference voltage for the analogue video out might be incorrect.
This is the part of the circuit that manages the power for the analogue video, if any of this is bad, things won’t work properly.

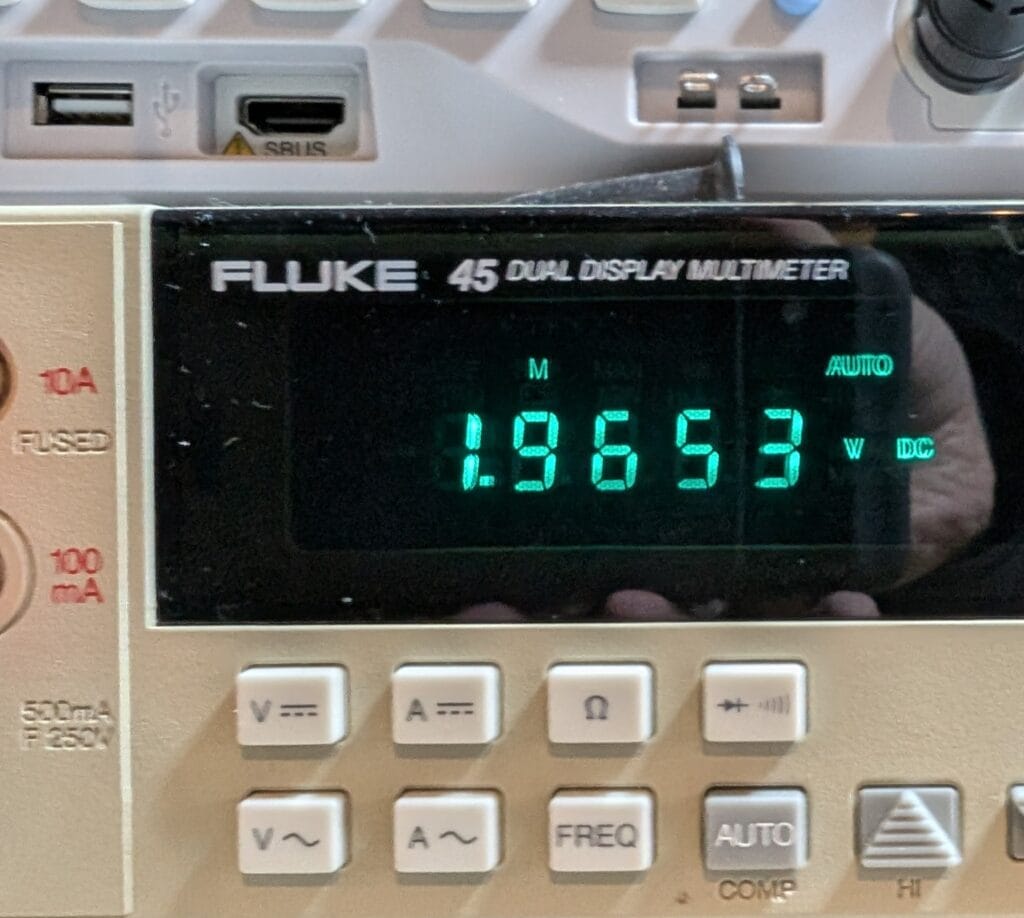
The LM385-1.2 is a voltage reference that provides a 1.235V input to the VREF of the video DAC. So, let’s measure what the VREF really is.

That is quite a bit higher than it should be. Going back to the circuit we see C500 is between the VREF pin and the +AVID pin. I figured this ceramic capacitor might have turned into a resistor. Sure enough, when I removed it, it read around 1K resistance. I replaced this with a new capacitor and tested again. It was now showing the correct voltage. But how about the picture?

Well… the text is a little more visible now at least!
I tested everything else around the DAC, and it all seemed to be fine. So, I desoldered the DAC and put a replacement in.

This made no difference whatsoever. Which made me think that this was maybe a problem before the DAC, on the digital side.
ZZ9000
In my Amiga 3000 there is a ZZ9000. This, among other things, is an RTG graphics card for the Amiga. It has a smaller board on cable which slots into the video slot of the Amiga, reads the digital video signals before they are converted to analogue, and puts the image out onto an HDMI. So, let’s try that.


This looks familiar. OK, so, the output of Lisa is bad. There has to be a reason for this, and hopefully, it isn’t Lisa itself. I ran some more tests, and it is here I was given a major clue.
Testing in DiagROM
Using the serial port to see the output, I ran some tests just in case something like the interrupts from Paula misbehaving. I hit C-A-A to reboot and this is the point where a major clue was given. The video was significantly worse and serial port data stopped dead, despite DiagROM executing.
This gave me the idea that the reset circuit is not working correctly. Now, the reset circuit is complicated in an Amiga 4000, and I don’t have a good diagram for it all, but I’ll try to explain how it works using this diagram.

The _KBRST signal comes from Gary when it has determined it needs to reset the machine (more events than just keyboard can trigger this, despite the name). This is then split into a whole bunch of buffered reset signals using U140 and U141. The key one I’m interested in here is _IORST.
_IORST feeds into both Lisa and Paula. Lisa handles the digital video (like Denise in 16bit Amigas) and Paula, among other things handles the serial. If these aren’t being reset correctly, then that could well explain the weirdness I’m observing. I tested with an oscilloscope, and it appears that no reset signal is being sent down this line.
I desoldered U140 and popped it into my chip tester.

Bingo, that would do it!
I replaced this chip (U140, middle of the three in the photo below) and tried again. Not the best pin alignment I’ve done when soldering, but it is good enough.


Fantastic! The good news is we have correct video. The bad news is it is still only working via an OSSC, when plugged into my regular Sony TV, I just get a black screen. So, I think there is still an analogue signal/power problem. But I’m one step further along.
More video repairs
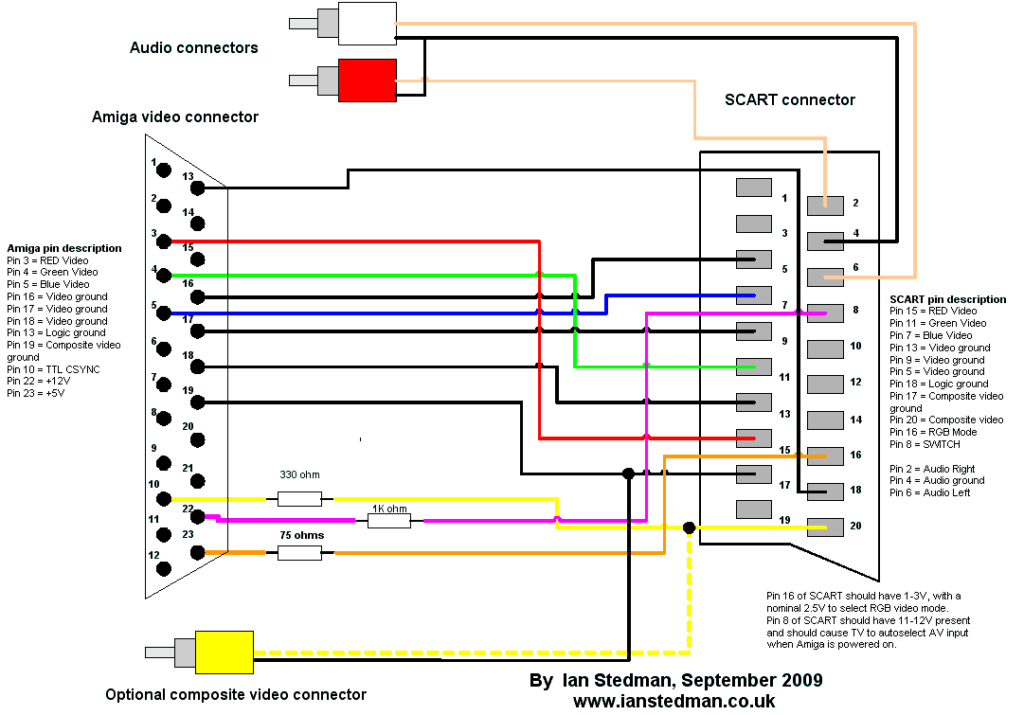
So, the remaining video problem is that I get a blank video image on the SCART when connected to a TV and my Amiga VGA adapter doesn’t even bring the monitor out of DPMS. This is when an idea hit me. To help explain it, here is Ian Steadman’s Amiga SCART wiring guide:

Now, look at pin 16 of the SCART cable. This needs to have a voltage on it to trigger an RGB signal. Otherwise, SCART goes into composite mode, which will be a black picture on this Amiga because the composite is connected to CSYNC, just the sync signal. This is exactly what I’m seeing. On the Amiga side, this is connected to a 5V line.
If this 5V wasn’t there, that would break the VGA dongle’s output as well, it needs 5V to power the sync and RGB buffers.
Let’s see how this pin is wired on the port. There is a ferrite FB462 which connects this pin to the +5V_USER line.


In this final photo, we can see the ferrite touching the red audio socket. Here is the problem, if you compare with the other ferrites in the picture you can see that one of the legs is completely missing. The ferrite is broken and there is no +5V to the Amiga video port. Yes, the board also needs a recap still, that will come later.
I removed the red audio socket, replaced this with a different type of ferrite and soldered the socket back on. I then tested the board with the Sony TV via SCART, if all is good, we should get a picture now.


Perfect! All the video problems appear to be solved. I will have to replace those audio sockets at some point. What appears to have happened is they have been pushed / bent backwards and that has snapped the ferrite behind it. These legs should be straight, you can see where they have buckled near the solder joint.

Next time
This has been significantly more work to resolve the video issues than I anticipated. But, touch-wood, the rest of the work should be straight-forward. On my to-do list for the motherboard is, in no particular order:
- Add a socket for the Buster chip
- Clean-up the buster chip some more and test it
- Test the RTC area
- Solder U177 back on (test it first and replace if required)
- Solder U891 back on (test it first and replace if required)
- Remove J975, it is corroded and unused
- Replace the SIMM sockets
- Replace the joystick/mouse ports
- Replace the audio sockets
- Test the power and drive LED traces, fix if required
- Recap the entire motherboard and CPU card
- Test everything!
- Put some new solder mask down over the exposed traces
I’m pretty sure many would have given up that this point, stripped the board for parts and built a ReAmiga motherboard with them. But, it is important to me, especially given where this machine came from, that the board is preserved as much as possible.


Leave a Reply