

A lot of people my age went from the 8bit era to the 16bit era and then PCs. I took a very different route and, as such, I want to build a machine compatible with what I would have had in the 90s.
My history
In the 1980s, one of my parents was a teacher, which led to us having a BBC Micro at home. This is what I first learnt to program on at a very young age. Over the years, especially the early 90s, I collected a lot of 8bit machines (2x C64, Atari XEGS, PET, another BBC).
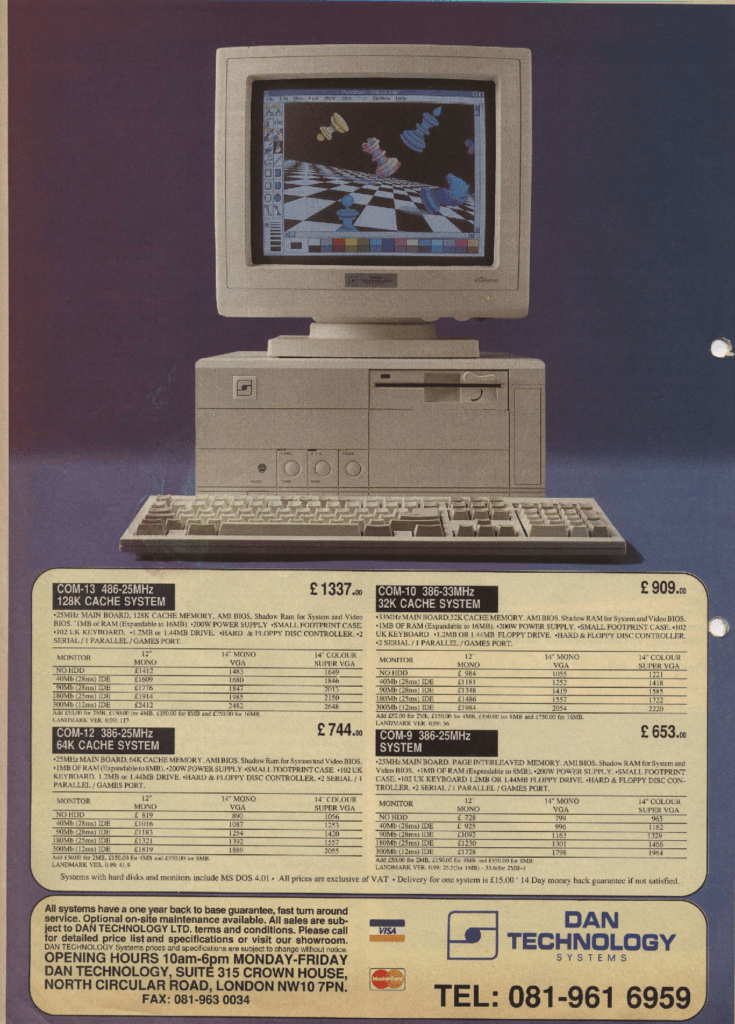
Roll on to around 1991, my family moved house and around then we acquired our first family PC, a Dan Technology 486SX 25MHz. I think it had 4MB of RAM and a hard drive. I don’t have any photos of this era. But I immediately latched on to this machine and ended up tinkering and upgrading it over the early to mid-90s. We also had an Amstrad 1512 in the house, but this was for my father’s work, so I didn’t use that often.
After a lot of searching, I found an advert for the PC we had.
This project
I have a lot of nostalgia for this era of PC computing, so, I decided to start 2025 building a 486 PC. There are some things in my head that I wanted for it:
- VLB motherboard and video card – I’ve never tried this, and it sounds interesting.
- At least a 486DX CPU – I want to at least run Doom well enough on this thing.
- SCSI support – This will allow me to do lots of useful things in the future. I’ll get a BlueSCSIv2 for it.
- PicoGUS – Allows me to change sound card type on-the-fly for various games.
This machine will end up being a mix of old and new, useful for 486 gaming and trying out hardware.
Case
I really wanted a desktop beige case. Unfortunately, even a tower beige case has become very rare, and desktop cases in the right physical format are very difficult to obtain. There was a UK company called Evercase supplying them a couple of years ago, but they now only sell black tower ATX cases or small form factor desktop cases, which will be difficult to find a motherboard for. So, I bought one of their towers.
A couple of things you may notice here, first is that there is already a power supply. I will dig into this shortly, but also the metal backplate has an AT keyboard socket. This came with a wire harness which converts an ATX power supply to AT. The wire harness is in there, but this won’t be the one I finally use, this has the wrong style power switch.
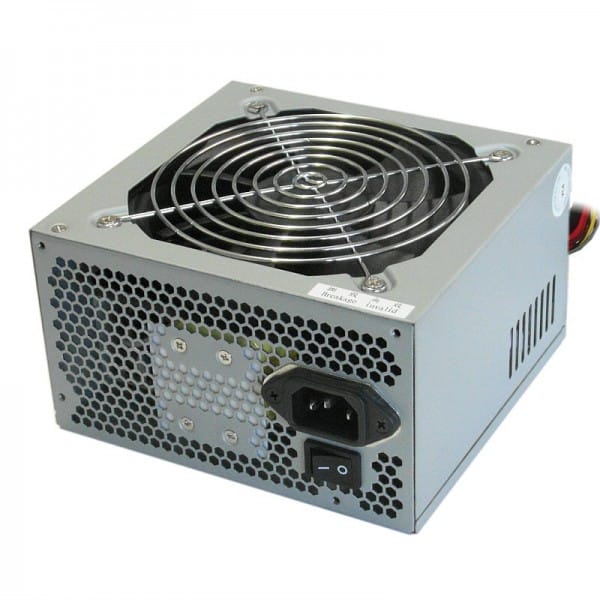
Power supply
PC power supplies have gone through several changes over the years. Two of which affect 486 era PCs. The first is losing the -5v line. Technically, the motherboard usually wouldn’t use this, but it is passed to the cards plugged into the motherboard, and it is used in a few things such as early sound cards. It isn’t essential for my built to have this, but it is a nice-to-have if I test such cards in the future.
The next is the power on the voltage lines. Around the Pentium 4 era, PCs started using DC-DC converters on the motherboard’s 12V line to power the CPU. Therefore, the power supplies started prioritising 12V instead of 5V. So, I need to make sure I get a power supply which prioritises the 5V line.
Evercase sell a PSU that meets both of these requirements. I bought this at the same time as the case and it came fitted.
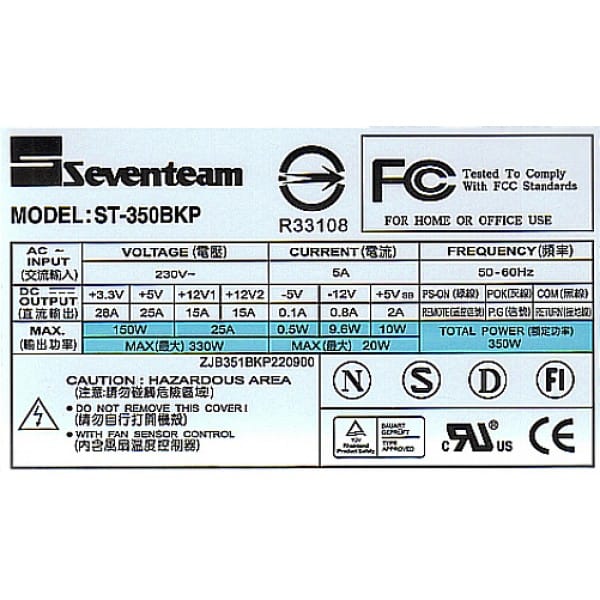
To fit the power switch of the wire harness (the second one), the face needs to be pulled off, and the two screws holding the LEDs on need to be removed. This exposes the glued-in power switch, which is then changed for the wire-harness one.
This needs to be done for two reasons:
- There is nowhere on the motherboard to hook up the power switch, AT power supplies did not have soft power switches.
- The power switch on ATX cases is not latching, logic on the motherboard usually does this, the switch on the harness is latching.
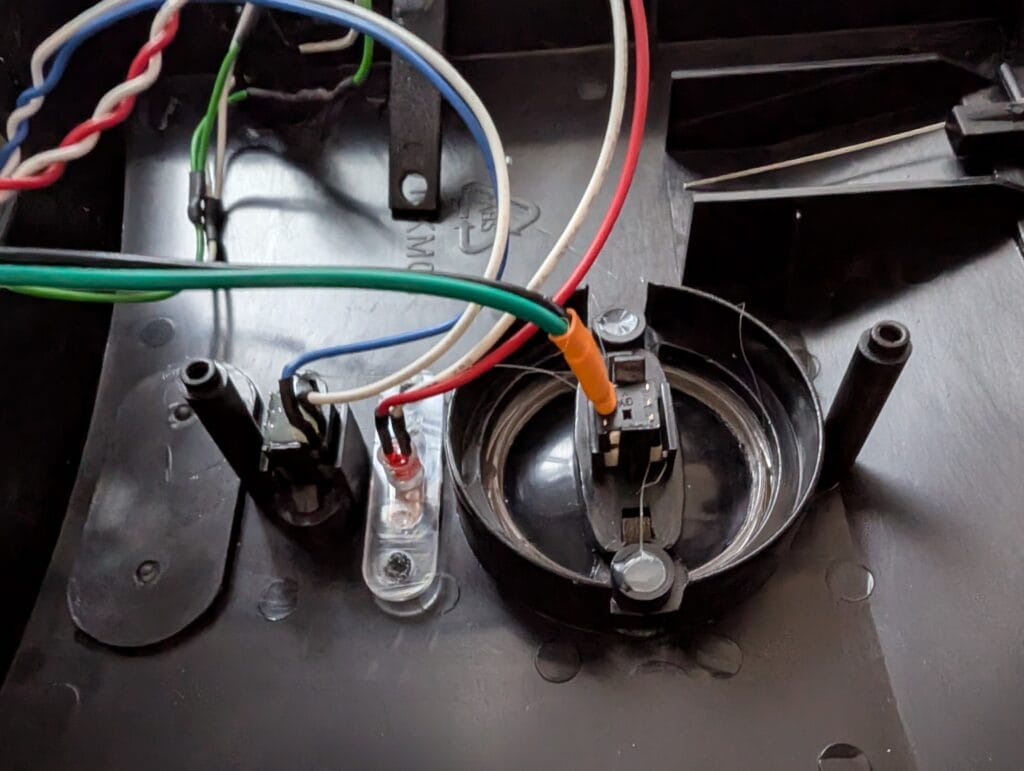
The first photo is behind the power button before I started, the second is the new power button clicked into place.
Drives
I had the first two drives ready to go in. I have a spare black floppy drive in very good condition, so this was a no-brainer. I needed a SCSI CD-ROM drive to meet my SCSI specification. I wanted a black one to match the case, but those are a little difficult to obtain. For now, I found in my spare parts a Yamaha 4x4x16 SCSI CD-RW drive, which I configured to be the terminator.

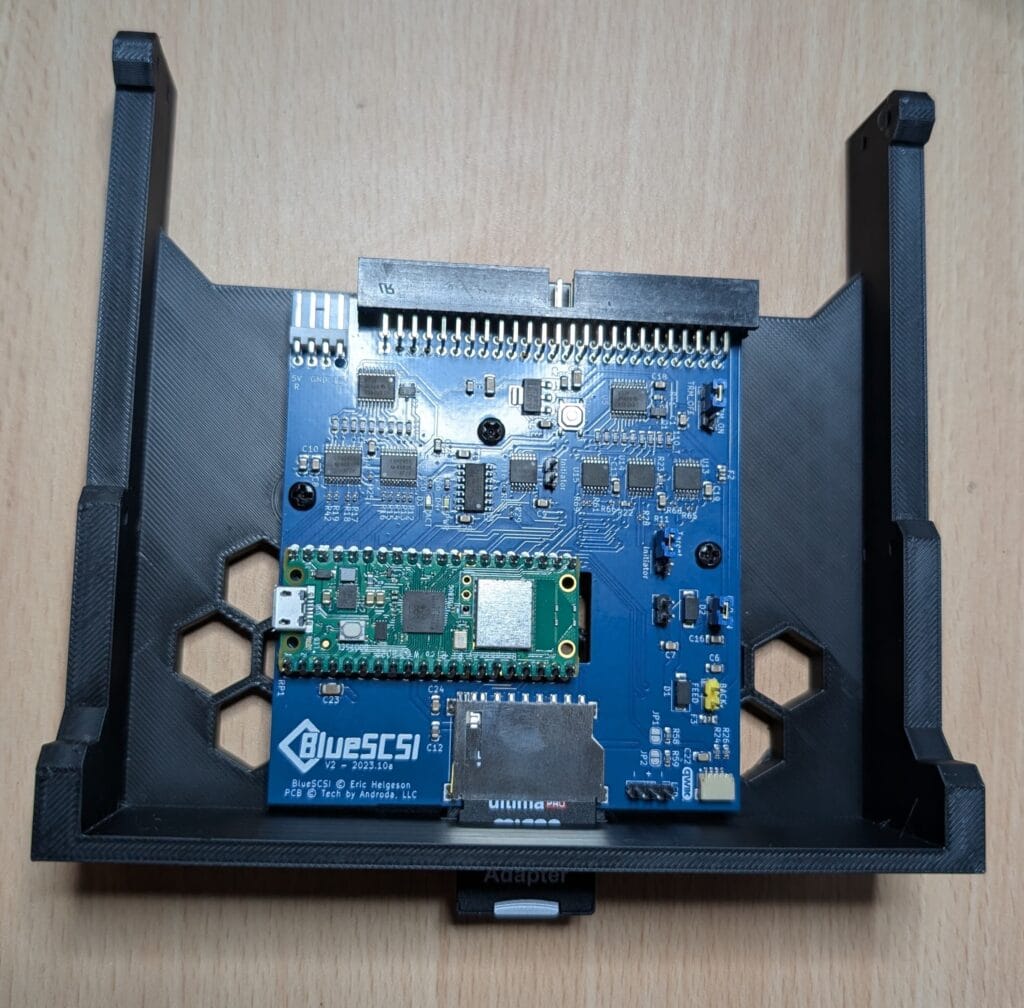
You can see the BlueSCSIv2 ready and in the bottom 5.25″ bay. I 3D printed this design for it in black to match the case.
Motherboard
For the motherboard, I have a Biostar MB-1433/50AEA-V. This came with a 486SX-25 soldered down, a Gainbery Maximizer GB586-133 in the socket. The Gainbery is basically a 5×86 CPU on a board to handle the lower voltage of the CPU. The motherboard also has 16MB of RAM in it.
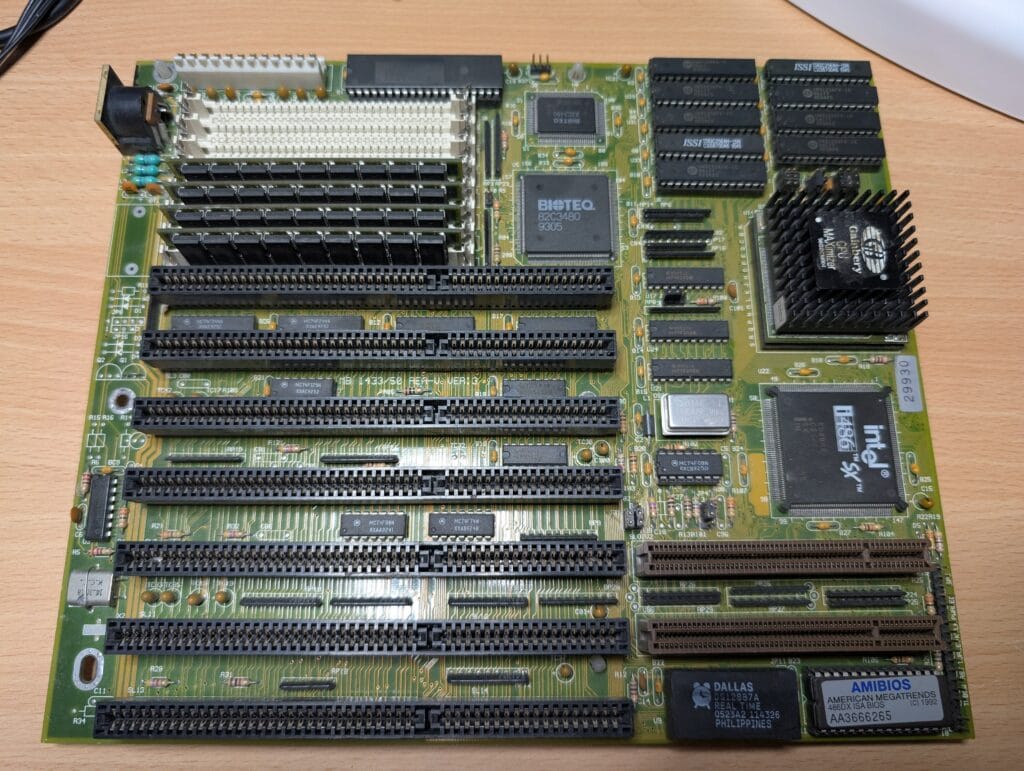
It had some plastic case mounts still in some of the holes. So, I used my trusty mount remover…

Yes, it is just a Bic pen without the ink cartridge, they are a perfect fit to go over the head of the mounts and push in the plastic springs.
Apart from that, the board could do with a little dust removal, but there is no sign of any damage.
Cards
I have a few options of cards here:
- Adaptec AHA-1542CF – A 16bit ISA SCSI and floppy drive controller card
- Iwill SIDE VLB – A VLB SCSI / IDE / floppy / parallel / serial card
- Trident 8916CX2/4/8 LC2 – A 16bit ISA VGA card with 1MB onboard
- PicoGUS – An 8bit ISA sound card which can emulate many different cards
- XT-IDE – An 8bit ISA IDE controller card


Ideally, I want the Iwill for my SCSI card, but I have the Adaptec as a backup. Eventually, I will have a VLB VGA card in here, but the ISA one will work for now. As for the XT-IDE card, that might be used for one of the tasks I want to try later on with this machine, unlikely to be used straight away.
HDD prep
There is an amazing emulator called 86box which you can use to emulate pretty much any period PC setup easily, from 8086 machines to early Pentiums. Using this, I created two 504MB images, one for boot with DOS 6.22 and one for data.
They are 504MB because it can be problematic to go higher than that in DOS. It is possible, but compatibility and lots of drives is fine by me. I should note early on, that the options below did not work for the BlueSCSIv2 for a boot drive. You need to configure for a SCSI card in 86box and then get DOS to format and install. Otherwise, the disk image just won’t boot. I fixed this later on.
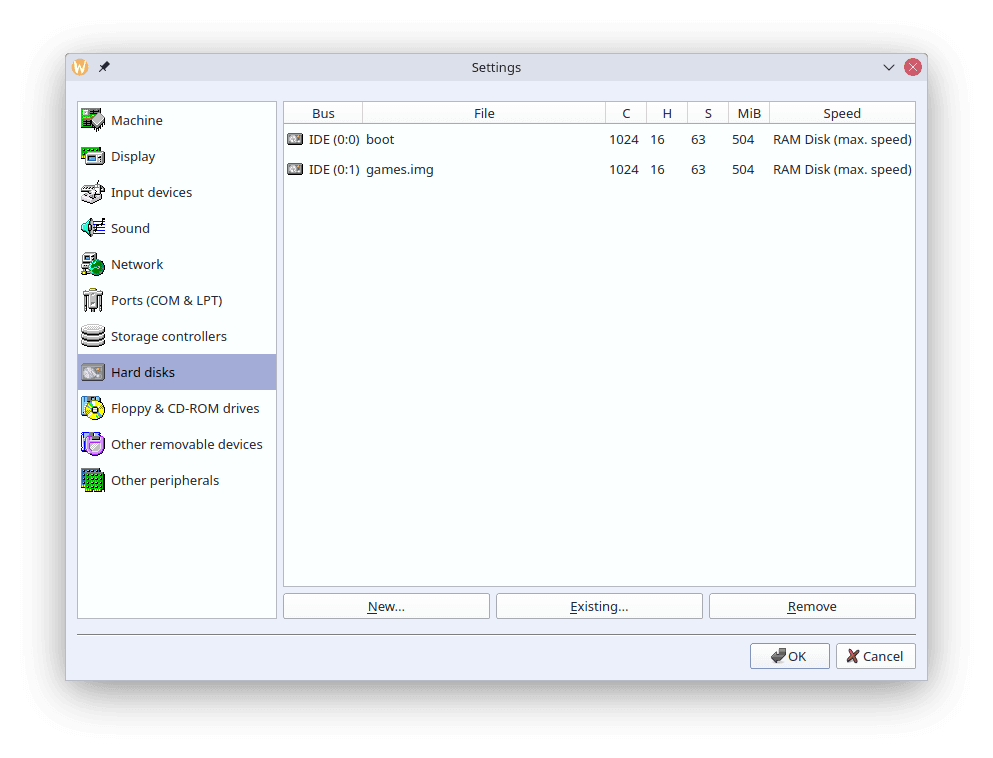
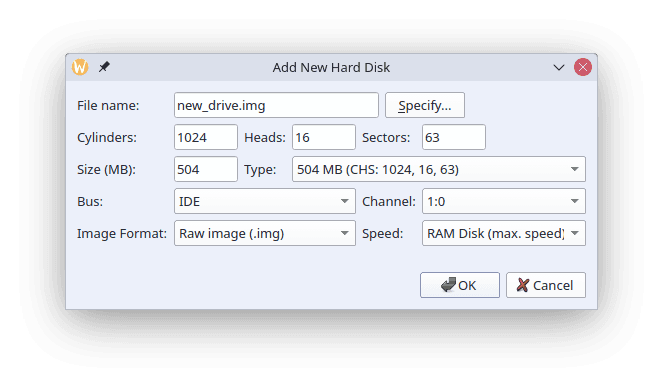
These are copied to the SD card of the BlueSCSIv2, renamed for the BlueSCSI drive mappings, and they should “just work” as the first and second hard drive. It also means it will be easy to pull the SD card, mount the images on my Linux laptop, and alter them as needed. I can also configure this emulator as close as possible to the PC configuration to test things with these images.
To mount full hard drive images created this way in Linux, you can do:
sudo losetup -fP HD00.hda
sudo mount /dev/loop0p1 /mnt
You can now change the files, noting that DOS 6.22 only supports 8.3 filenames (eight characters, a dot and three characters). Anything longer will be truncated to 6 characters and have a ~1 at the end of the name.
To unmount:
sudo umount /mnt
sudo losetup -d /dev/loop0
Testing and fixing
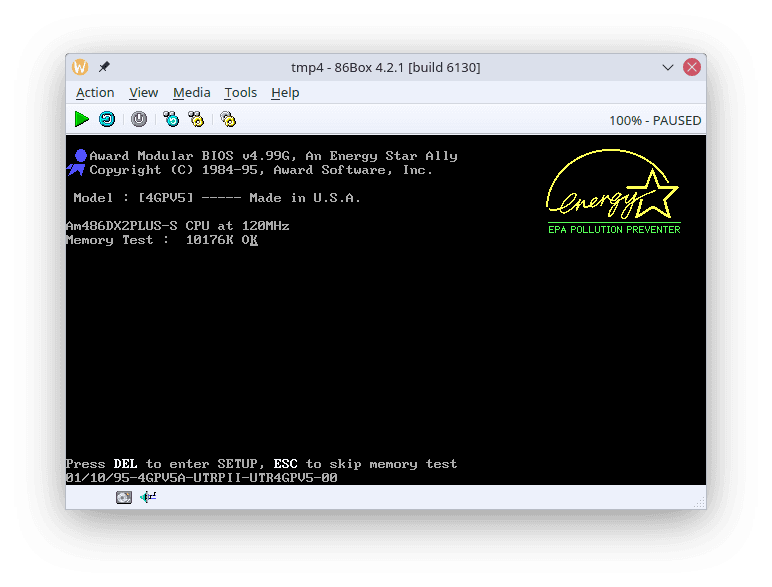
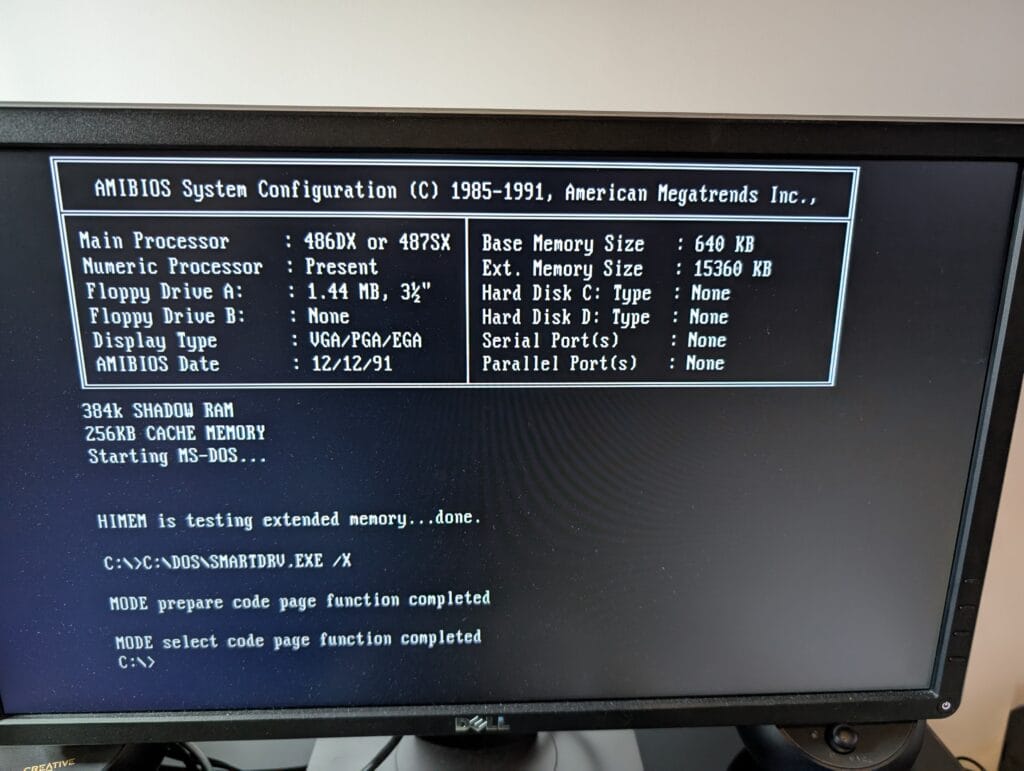
Before we put it all together, let’s test the motherboard. I ran it outside of the case with just the VGA card plugged in.


Excellent! It seems the BIOS boots and detects the memory. There is something I want to do before installing the board, though, that is replacing the tantalum capacitors on the +/-12v lines. During this era, they were typically under-specified for 12v and fail short-circuit, particularly after 30+ years.
These were swapped for electrolytic capacitors. Given the use case for these capacitors, modern electrolytics will work well.
Installation
To install the motherboard, the posts for the case need to be moved into the correct positions. This motherboard has 6 holes and the case has positions for all of them. Using my trusty 5mm bolt screwdriver, I put them all into the correct position.
I put the spares in the holes near the power supply because the motherboard won’t reach that far, and they are handy if I change it in the future.

I got everything wired up as best I could, but this is where I hit my first problem.
You’ll notice that I haven’t plugged in the power connectors to the motherboard, this is because the power switch is cabled to the wire harness, and the cable for the power switch is not long enough to be able to connect the motherboard. I will have to extend it, but for trying things out, I switched back to the wire harness with the large power switch.
I did some testing and I hit more problems:
- My old, reliable FDD drive no longer wanted to read disks properly.
- Whilst the SCSI drives were being detected, the system refused to boot from them.
- The CD drive was very noisy.
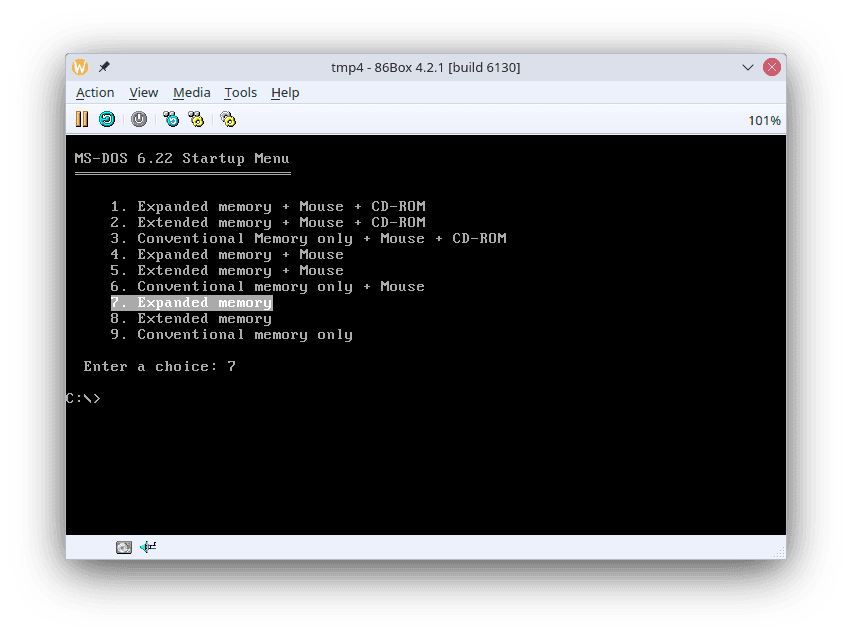
Problem 2 was solved by reconfiguring 86box for SCSI instead of IDE and installing DOS again. Then, once that image was copied, we had a booting machine.
Problem 1 and 3 were solved by removing the drives. I put the BlueSCSIv2 terminator back on so that this would still function. I also have a replacement dual-floppy drive to use instead of the original drive.
More problems
These problems were found and solved in a very different order, but this is every issue I hit and how I solved them.
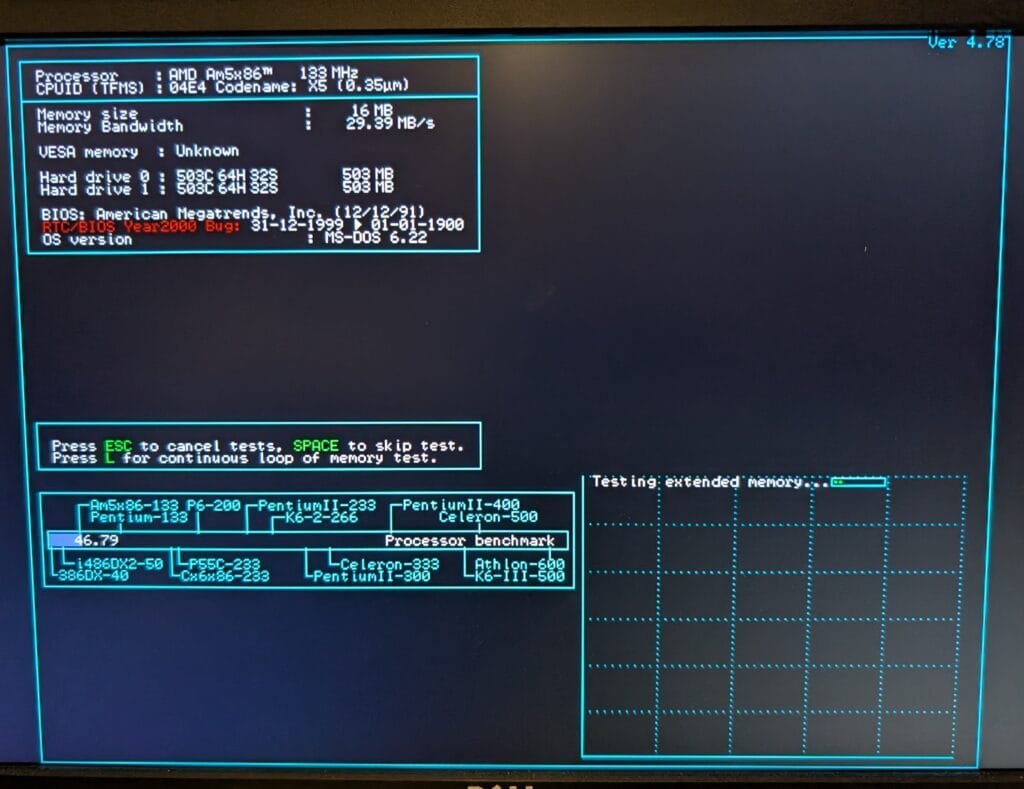
Problem 1: Machine very slow
The machine appeared to be running slow for the CPU / clock speed. Running a benchmark showed just how poor the performance was.
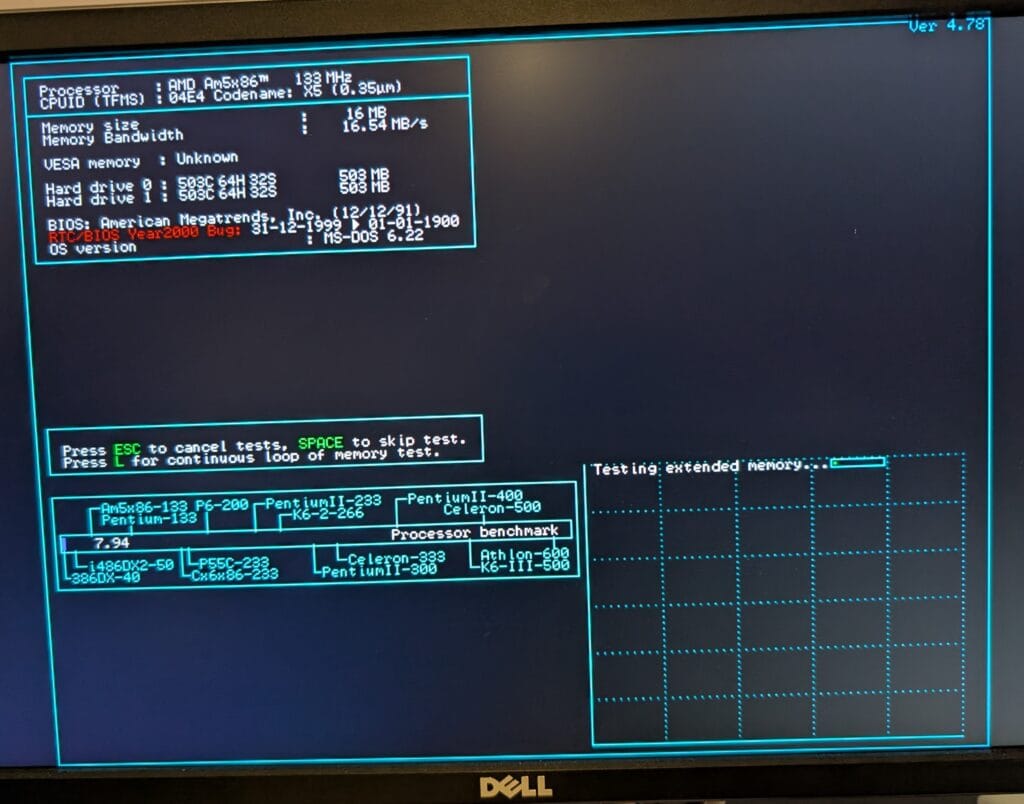
The CPU is an Am5x86-133, so the CPU performance chart should match that. After puzzling over it for a few minutes, an old memory suddenly hit me! PCs of this era had a concept of a “turbo” switch. This allowed the machine to run at a much slower speed for compatibility with legacy software. ATX cases did not typically contain such a switch. I resolved this by putting a jumper on the turbo switch pins.
Problem 2: PicoGUS
The PicoGUS software was not detecting the board properly, it was coming up with scrambled IDs when trying to detect it, and other oddities. I figured the clock speed for the ISA bus was too high, it was set to CLK2/3, CLK2 is half the clock crystal, which itself is 66MHz. So, the ISA bus was configured for 11MHz. I slowed this down to CLK2/4 (8.25MHz) and the audio started working properly.
This led to problem 4, I’ll get to that.
Problem 3: More PicoGUS
The PicoGUS kept crashing the entire system immediately when running Doom. I don’t know exactly why this was happening, but switching to DMA 3 and IRQ 7 in one move fixed it.
It is still having unexpected issues with some games, but at least it works well with Doom.
Problem 4: SCSI card
Now that I had the ISA bus set so the PicoGUS worked, the SCSI card decided it did not want to detect SCSI devices anymore. I swapped this out for the Adaptec card, making sure to set the address to something other than 330 so that it doesn’t conflict with the default MIDI music address. The Adaptec card appeared to tolerate things a lot better.
End result
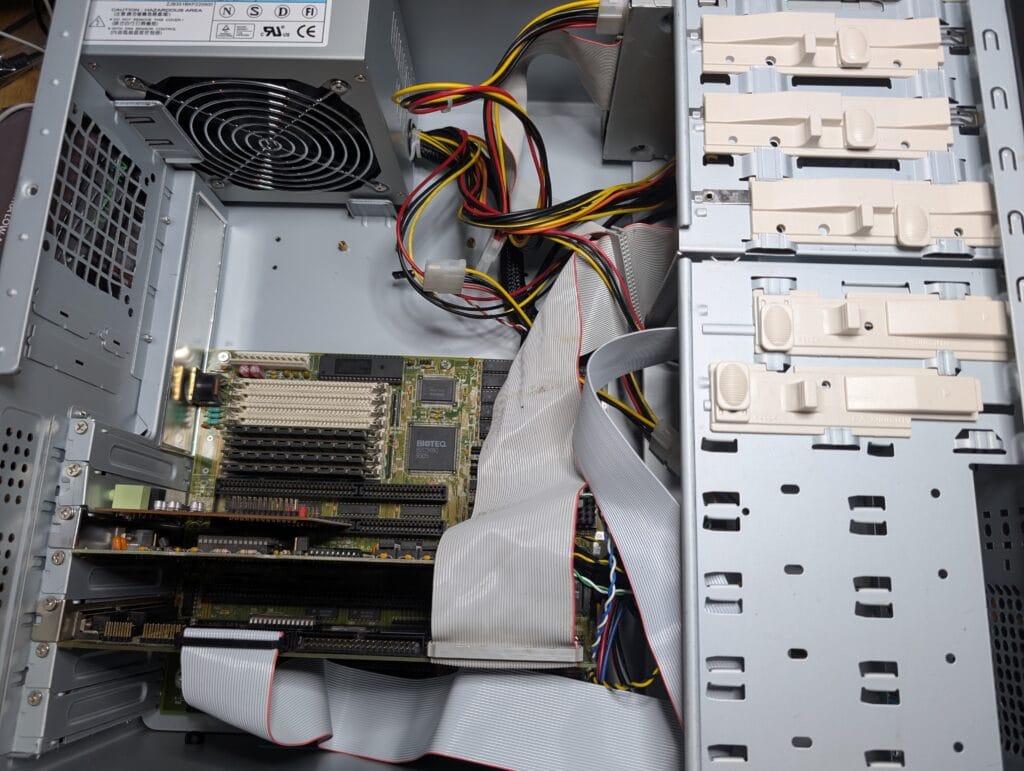
After all the problem-solving, I ended up with the machine looking like this.
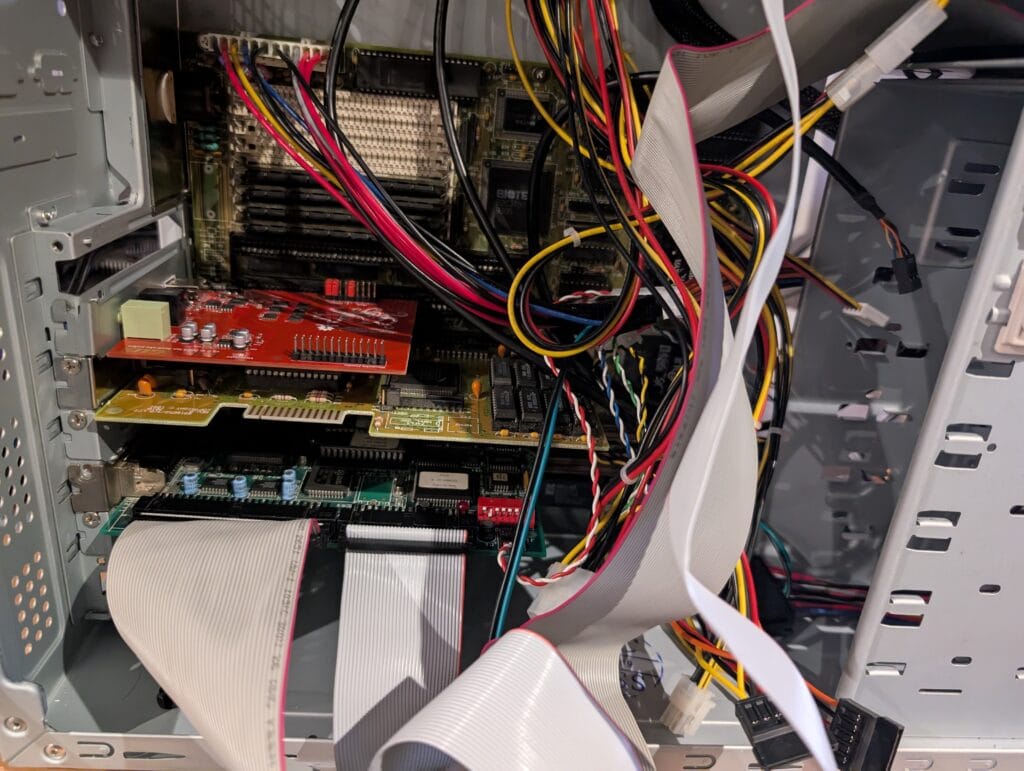
Very messy, but at least it appears to be fully functional now.
Finishing up
Time to tidy up this machine a little bit. I removed the power switch again, along with the wire harness, desoldered the switch and soldered extensions to the wires. Probably overkill, but it shouldn’t be a problem now.
I then put the blanking plates and screws into the expansion card slots, put the cover back over the unused drive bay and put the sides back on.
The cables are definitely not tidy, but I will be making some changes to this machine and wiring some more things into it. So, I don’t really want to tidy it up at this stage just to undo it all again.
Future
I have more hardware on the way for this machine, and as I hinted at, an upcoming tasks for it with the XT-IDE. There will definitely be more blog posts involving this machine in the future.
Leave a Reply